Ozdat Home Feature Cars Ozdat Classifieds Event Calander Links Trade Link Tech Resource Merchandise Donate Web Mail
It is currently Sat May 11, 2024 3:56 am

All times are UTC+11:00


Post new topic  Reply to topic  [ 254 posts ]  Go to page « 111 12 13 14 1517 »
Author Message
PostPosted: Fri Feb 13, 2015 8:14 pm 
Offline
User avatar

Joined: Sun Jul 04, 2010 10:18 am
Posts: 1571
Nice work on the dash & congrats on the bub :)

Have a chat with Randy @ Nisco, he might be able to help.

_________________
1600 Build: http://ozdat.com/forum/viewtopic.php?f=59&t=22694


Top
   
PostPosted: Sat Feb 14, 2015 12:01 am 
Offline

Joined: Tue Mar 04, 2003 4:10 pm
Posts: 343
PM sent
Azzdat16 wrote:
Does anyone have any experience with that Sanjay Dude mentioned above?


Top
   
PostPosted: Sat Feb 14, 2015 11:10 am 
Offline
User avatar

Joined: Fri Sep 24, 2004 1:54 pm
Posts: 1718
Location: Melbourne, VIC
A few of my mates have used Sanjay and they all liked him, he seems pretty helpful and not too up tight.

_________________
build-threads.com


Top
   
PostPosted: Sat Feb 14, 2015 2:09 pm 
Offline
User avatar

Joined: Mon Aug 05, 2013 5:47 pm
Posts: 289
Location: Melbourne
Thx for the replies boys.

Spent some time last night installing the chrome trim around the rear window.
Not the most enjoyable task but well worth the effort!
[ img ]
[ img ]

I also gave the rear pillar vents a bit of loving. It looks like they were painted black over the chrome. I bit the bullet and stripped all the paint off, and to my amazement revealed almost immaculate chrome underneath..... Stoked!!

Before.....
[ img ]
[ img ]

After....
[ img ]
[ img ]


Top
   
PostPosted: Tue Mar 03, 2015 8:51 pm 
Offline
User avatar

Joined: Mon Aug 05, 2013 5:47 pm
Posts: 289
Location: Melbourne
So as I've mentioned in previous posts, the previous owner purchased a wiring kit and made up the full loom inc headlight, engine, dash etc. I contacted him a few days ago and he said the loom is basically 95% complete. So based on that info I have begun looking at how I want the loom run.
So far I have done the headlight loom, most of the engine harness and hidden the wiring as best I could, not looking for crazy hidden wiring like Joel's mental as orange Datto (craziest wiring job I've ever seen).
Anyway.... Pics
[ img ]

[ img ]

I also started looking at how I'm going to mount the gauges in the front dash fascia....... Any handy hints on the best way to do this?.......anyone........ Anyone........ Anyone?????

Also need some opinions on the gauge backlight colour? The left colour is the standard colour that came with the genuine VDO gauge set and the one on the right is with a different LED "white" I had lying around. Not sure whether to go the old school yellow look or the more modern crisp white??
[ img ]


Top
   
PostPosted: Wed Mar 04, 2015 9:10 am 
Offline
User avatar

Joined: Fri Sep 24, 2004 1:54 pm
Posts: 1718
Location: Melbourne, VIC
looking good mate! not sure about mounting the gauges, never done it myself. As for the backlight colour, hard to choose! Personal preference I guess.

This post was not helpful at all :lol:

_________________
build-threads.com


Top
   
PostPosted: Wed Mar 04, 2015 9:16 am 
Offline
Moderator
User avatar

Joined: Sat Oct 30, 2004 2:28 pm
Posts: 5357
Location: Melbourne, Australia
Depends on whether you go old school or have a new flavour.
I went old school 'green' and it looks ace.
Unfortunately my autometer cobalt gauge mounted down low doesn't match, but matches with my boost controller and turbo timer/volt gauge.

_________________
1972 Datsun 1600, S14 SR20DET Engineered (204rwkW @ 17psi.)
viewtopic.php?t=6579
#SR20Datsun @SR20Datsun


Top
   
PostPosted: Wed Mar 04, 2015 10:31 am 
Offline
User avatar

Joined: Mon Aug 05, 2013 5:47 pm
Posts: 289
Location: Melbourne
Thanks for your awesome advice Anth!!! Ill def take that little piece of wisdom to the grave!! :)

Im kinda leaning more towards the old school yellow. I wanted these gauges specifically due to the original period correct style, so I don't wanna stray too much from that thought.


Top
   
PostPosted: Wed Mar 04, 2015 11:19 am 
Offline
Moderator
User avatar

Joined: Sat Oct 30, 2004 2:28 pm
Posts: 5357
Location: Melbourne, Australia
When you say mounting the gauges, are you referring to the factory speedo/tacho positions or a different area?
Mounting in the factory locations is a pain, but well worth it. I used VDO's, but others have used GPS gauges (Datsport have 'em)
Putting gauges where the factory radio used to go is easy, but then you can't run a radio (no big deal if you ask me) although if you want to run a radio, then Gilson Design has a centre console that bolts straight in, you mount the radio and 3 gauges!
I would've done it like this as it's a cracker of an idea.

_________________
1972 Datsun 1600, S14 SR20DET Engineered (204rwkW @ 17psi.)
viewtopic.php?t=6579
#SR20Datsun @SR20Datsun


Top
   
PostPosted: Wed Mar 04, 2015 8:47 pm 
Offline

Joined: Tue Aug 19, 2003 11:33 am
Posts: 93
Location: Canberra
Did you need to use a special stripper to clean up the vents???? as I'd like to do the same to mine but been too scared of wrecking them and melting the plastic

Thanks

Swanny


Top
   
PostPosted: Wed Mar 04, 2015 9:38 pm 
Offline
User avatar

Joined: Mon Aug 05, 2013 5:47 pm
Posts: 289
Location: Melbourne
SR20Datsun - Yea i want to mount them in the factory position where the taco, speedo etc sit in the factory fascia...... Just trying to get my head around the best way to do it????? If someone has done it before it saves me from trying to fab something up.

swanny - No special stripper. I tested it on a corner and it didn't take any chrome off.
So i did the whole thing and it came up awesome.


Top
   
PostPosted: Wed Mar 04, 2015 9:43 pm 
Offline
User avatar

Joined: Fri Sep 24, 2004 1:54 pm
Posts: 1718
Location: Melbourne, VIC
Azzdat16 wrote:
SR20Datsun - Yea I want to mount them in the factory position where the taco, speedo etc sit in the factory fascia...
[ img ]

_________________
build-threads.com


Top
   
PostPosted: Thu Mar 05, 2015 8:34 am 
Offline
Moderator
User avatar

Joined: Sat Oct 30, 2004 2:28 pm
Posts: 5357
Location: Melbourne, Australia
With mounting my VDO speedo gauge, I ended up cutting bits out of the circuit board and soldering on wires where I broke the tracks. It's a bit of a pain, but it can be done. I didn't have to modify the shroud in any way and it sits like factory!
Fits like a glove

_________________
1972 Datsun 1600, S14 SR20DET Engineered (204rwkW @ 17psi.)
viewtopic.php?t=6579
#SR20Datsun @SR20Datsun


Top
   
PostPosted: Fri Mar 06, 2015 4:33 pm 
Offline
User avatar

Joined: Mon Aug 05, 2013 5:47 pm
Posts: 289
Location: Melbourne
Anth510 wrote:
Azzdat16 wrote:
SR20Datsun - Yea I want to mount them in the factory position where the taco, speedo etc sit in the factory fascia...
[ img ]
I give you that!
Not sure how accurate that would be!!


Top
   
PostPosted: Sun Mar 08, 2015 10:45 pm 
Offline
User avatar

Joined: Mon Aug 05, 2013 5:47 pm
Posts: 289
Location: Melbourne
Tonight i locked myself in the garage, cranked some tunes, stocked the bar fridge full of beer and and got to work........

Started retro fitting the indicator and high beam lights into the SSS dash tonight.
High beams:
[ img ]

Indicators:
[ img ]

Thought i might as well begin to get the rear section of the carpet cut and fit properly. I have laid down the sound deadener and underlay. Ive also run the rear loom to the tail lights. I just need to complete the wiring for the fuel pumps.
Plus i just wanted to make sure the carpet i sourced was going to be a good fit.....
Excuse the tear in the rear seat...... ill be fixing this shortly as it bugs the crap out of me seeing it in these pics......
[ img ]
[ img ]

It fits pretty good, as these pics are literally just plonking the carpet down. I still need to lay it down properly with some adhesive spray and trim the edges, and put the required holes in for the front seats, and also the seat belts etc.
I was a bit unsure about my colour selection and how it would go with the beige factory seats, but i'm pretty happy. It creates a nice bit of contrast, plus i didn't really wanna go a light colour which wears quickly and shows a lot of marks/wear etc/

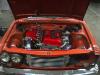
Also finished off the the fuel system tonight. Mounted the FPR and plumbed that up to the fuel lines.
Now just to continue with the wiring loom. I'm just sorting out where to mount things like the fuse box and relays etc. Then sort out the route of the actual wiring and how to tuck it up under the dash.
This process is definitely a stretch in relation to my knowledge. But i am enjoying reading up and learning.
I'm sure at some stage i will need an auto elec to come and give me some assistance..........


Top
   
Display posts from previous:  Sort by  
Post new topic  Reply to topic  [ 254 posts ]  Go to page « 111 12 13 14 1517 »

All times are UTC+11:00


Who is online

Users browsing this forum: No registered users and 1 guest


You cannot post new topics in this forum
You cannot reply to topics in this forum
You cannot edit your posts in this forum
You cannot delete your posts in this forum
You cannot post attachments in this forum

Jump to: 

Powered by phpBB® Forum Software © phpBB Limited