Hi all,
I joined Ozdat in 2009, so been on here a while and thought it was about time i started a build thread so other members can see what i'm building and see the car in which i ask a lot of advice about.
I'm building this car with the intention of having a tough, angry FJ under the bonnet, but still retain as much originality of the car as i can. Not deleting awesome metal badges, keeping 90% of chrome work etc. Basically not deleting door handles, locks or anything show like.
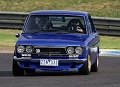
I still have the 1/4 mile bug, so i plan to full embrace it after i finish this car with many passes at WSID. Obviously a car with IRS is not the best weapon of choice for drag work, but the humble 1600 is still my favourite car and wouldnt race anything else.
My First Datto was one bought in 2005 from within the old school pages of the Trading Post. I bought it as a 4th year apprentice mechanic, didnt really have any idea what to look for when buying a Datto (hadnt even heard of Ozdat, datsport etc back then), just knew it was my favourite car and i needed to have one right now. So considering murphys law, things did go wrong.
It was an FJ turbo conversion with a semi good paint job and F90 silver simmons. The FJ had lots of HKS goodies on it, including a 25/40 huffer. It went really well, but after a bottom end knock (the skirts peeled all the way off the thrust bearing), cracked turbine hosuing and left side castor rod housing cracking due to rust, i stripped it and sold everything bar the interior, FJ and rear suspension and diff.
This car used to have the plates 321GO for those who can remember.
Sold the shell on eBay, another apprentice and his old man picked the shell up, lifted it onto the trailer and that was the end of that.
![[ img ]](http://i566.photobucket.com/albums/ss105/DATO4/HKS5101.jpg)
![[ img ]](http://i566.photobucket.com/albums/ss105/DATO4/HKS5106-1.jpg)
![[ img ]](http://i566.photobucket.com/albums/ss105/DATO4/Olddato-1.jpg)
![[ img ]](http://i566.photobucket.com/albums/ss105/DATO4/hks5105.jpg)
![[ img ]](http://i566.photobucket.com/albums/ss105/DATO4/hks5104.jpg)
![[ img ]](http://i566.photobucket.com/albums/ss105/DATO4/HKS5103.jpg)
![[ img ]](http://i566.photobucket.com/albums/ss105/DATO4/HKS5102.jpg)
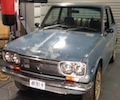
In 2009 i bought a rolling shell from a shop in Wollongong NSW. The previous owner couldn't pay the bill for work done on his other car in the shop, so the shop owner was selling his rolling shell he also had down there as a resto project. It came with a full set of doors, newish RH guard and boxes of spares in the boot. Good old poo brown colour. Usual rust in roof sills and dog legs, front end etc, but the floor pan was perfect with no rust whatsoever.
![[ img ]](http://i566.photobucket.com/albums/ss105/DATO4/a10.jpg)
![[ img ]](http://i566.photobucket.com/albums/ss105/DATO4/IMAG0242.jpg)
![[ img ]](http://i566.photobucket.com/albums/ss105/DATO4/IMAG0290.jpg)
![[ img ]](http://i566.photobucket.com/albums/ss105/DATO4/a1.jpg)
![[ img ]](http://i566.photobucket.com/albums/ss105/DATO4/ROLL9.jpg)
![[ img ]](http://i566.photobucket.com/albums/ss105/DATO4/ROLL10.jpg)
![[ img ]](http://i566.photobucket.com/albums/ss105/DATO4/ROLL7.jpg)
![[ img ]](http://i566.photobucket.com/albums/ss105/DATO4/ROLL11.jpg)
![[ img ]](http://i566.photobucket.com/albums/ss105/DATO4/ROLL6.jpg)
Stripped and taken to the blasters in Brookvale
![[ img ]](http://i566.photobucket.com/albums/ss105/DATO4/a5.jpg)
![[ img ]](http://i566.photobucket.com/albums/ss105/DATO4/a3.jpg)
![[ img ]](http://i566.photobucket.com/albums/ss105/DATO4/a4.jpg)
![[ img ]](http://i566.photobucket.com/albums/ss105/DATO4/Blasting3.jpg)
I had trouble with the first panel beater. He was a sole trader, going bust half way through panel repairs on it. It subsequently went to a retired family friend after that, who has some ridiculous amount of experience as a panel beater (40 plus years). Being retired, he agreed to carry out panel work but was leaving paint to someone else. Considering he was only charging me $30/hr, and he is very good at what he does, we went ahead with giving all panels a new lease of life. I also spent countless hours welding and smoothing and learning a lot about panel beating along the way. So it worked out well in the end.. (i wont post up all pics, there's just too many)
a few shots from previous panel beater
![[ img ]](http://i566.photobucket.com/albums/ss105/DATO4/101_1546.jpg)
![[ img ]](http://i566.photobucket.com/albums/ss105/DATO4/101_1555.jpg)
![[ img ]](http://i566.photobucket.com/albums/ss105/DATO4/DNT7.jpg)
![[ img ]](http://i566.photobucket.com/albums/ss105/DATO4/DNT10.jpg)
![[ img ]](http://i566.photobucket.com/albums/ss105/DATO4/18112008645.jpg)
![[ img ]](http://i566.photobucket.com/albums/ss105/DATO4/17072008128.jpg)
![[ img ]](http://i566.photobucket.com/albums/ss105/DATO4/17072008130.jpg)
engine bay (can anyone pick up the mistake made on the L/H chassis rail?)
![[ img ]](http://i566.photobucket.com/albums/ss105/DATO4/TK28.jpg)
![[ img ]](http://i566.photobucket.com/albums/ss105/DATO4/TK29.jpg)
![[ img ]](http://i566.photobucket.com/albums/ss105/DATO4/TK34.jpg)
![[ img ]](http://i566.photobucket.com/albums/ss105/DATO4/TK31.jpg)
![[ img ]](http://i566.photobucket.com/albums/ss105/DATO4/TK32.jpg)
![[ img ]](http://i566.photobucket.com/albums/ss105/DATO4/TK37.jpg)
![[ img ]](http://i566.photobucket.com/albums/ss105/DATO4/TK36.jpg)
![[ img ]](http://i566.photobucket.com/albums/ss105/DATO4/TK35.jpg) Engine bay hole filling, spot welding chassis
Engine bay hole filling, spot welding chassis
![[ img ]](http://i566.photobucket.com/albums/ss105/DATO4/DNT9.jpg)
![[ img ]](http://i566.photobucket.com/albums/ss105/DATO4/TK6.jpg)
and spot welding both castor rod housing to ensure no repeats of last time
![[ img ]](http://i566.photobucket.com/albums/ss105/DATO4/TK25-2.jpg) RH 1/4 replacement
RH 1/4 replacement
![[ img ]](http://i566.photobucket.com/albums/ss105/DATO4/DNT2.jpg)
![[ img ]](http://i566.photobucket.com/albums/ss105/DATO4/17072008132.jpg)
![[ img ]](http://i566.photobucket.com/albums/ss105/DATO4/TK10.jpg)
![[ img ]](http://i566.photobucket.com/albums/ss105/DATO4/TK8.jpg)
![[ img ]](http://i566.photobucket.com/albums/ss105/DATO4/TK9.jpg)
![[ img ]](http://i566.photobucket.com/albums/ss105/DATO4/TK17.jpg)
![[ img ]](http://i566.photobucket.com/albums/ss105/DATO4/TK38.jpg)
LH 1/4 repairs
![[ img ]](http://i566.photobucket.com/albums/ss105/DATO4/DNT3.jpg)
![[ img ]](http://i566.photobucket.com/albums/ss105/DATO4/23092008498.jpg)
![[ img ]](http://i566.photobucket.com/albums/ss105/DATO4/23092008505.jpg)
![[ img ]](http://i566.photobucket.com/albums/ss105/DATO4/TK12.jpg)
![[ img ]](http://i566.photobucket.com/albums/ss105/DATO4/TK13.jpg)
![[ img ]](http://i566.photobucket.com/albums/ss105/DATO4/TK15.jpg)
![[ img ]](http://i566.photobucket.com/albums/ss105/DATO4/TK16.jpg) Hi Fill
Hi Fill
![[ img ]](http://i566.photobucket.com/albums/ss105/DATO4/b5.jpg)
![[ img ]](http://i566.photobucket.com/albums/ss105/DATO4/HIFILL6.jpg)
![[ img ]](http://i566.photobucket.com/albums/ss105/DATO4/HIFILL1.jpg)
![[ img ]](http://i566.photobucket.com/albums/ss105/DATO4/HIFILL11.jpg) as mentioned, there a gazillion update photos, but dont want to be too pic heavy. basically turned out like this ready for paint
as mentioned, there a gazillion update photos, but dont want to be too pic heavy. basically turned out like this ready for paint
![[ img ]](http://i566.photobucket.com/albums/ss105/DATO4/TK39-1.jpg)
![[ img ]](http://i566.photobucket.com/albums/ss105/DATO4/TK33.jpg)
![[ img ]](http://i566.photobucket.com/albums/ss105/DATO4/TK22-2.jpg)
![[ img ]](http://i566.photobucket.com/albums/ss105/DATO4/b6.jpg)
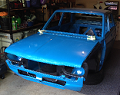
Painted by Greg Brookes in Lithgow, NSW. (it's not black, but dark grey). I always wanted a darker colour, black (with a leather interior) had already been done (e.g James Tuitt's VG30 turbo black stunner), so dark grey was the next option. It's a blue/purple pearl and a silver flake.
![[ img ]](http://i566.photobucket.com/albums/ss105/DATO4/IMG_0013.jpg)
![[ img ]](http://i566.photobucket.com/albums/ss105/DATO4/paint2.jpg)
![[ img ]](http://i566.photobucket.com/albums/ss105/DATO4/paint3.jpg)
![[ img ]](http://i566.photobucket.com/albums/ss105/DATO4/paint5.jpg)
![[ img ]](http://i566.photobucket.com/albums/ss105/DATO4/paint7.jpg)
![[ img ]](http://i566.photobucket.com/albums/ss105/DATO4/paint13.jpg)
![[ img ]](http://i566.photobucket.com/albums/ss105/DATO4/paint10.jpg)
![[ img ]](http://i566.photobucket.com/albums/ss105/DATO4/paint16.jpg) On the trailer ready to come home
On the trailer ready to come home
![[ img ]](http://i566.photobucket.com/albums/ss105/DATO4/sun2.jpg)
![[ img ]](http://i566.photobucket.com/albums/ss105/DATO4/sun9.jpg)
![[ img ]](http://i566.photobucket.com/albums/ss105/DATO4/sun12.jpg)
![[ img ]](http://i566.photobucket.com/albums/ss105/DATO4/sun13.jpg) that's it for now, post more up later
that's it for now, post more up later 
![[ img ]](http://i566.photobucket.com/albums/ss105/DATO4/guard2.jpg)
![[ img ]](http://i566.photobucket.com/albums/ss105/DATO4/guard3.jpg)
![[ img ]](http://i566.photobucket.com/albums/ss105/DATO4/guard1.jpg)
![[ img ]](http://i566.photobucket.com/albums/ss105/DATO4/guard7.jpg)
![[ img ]](http://i566.photobucket.com/albums/ss105/DATO4/guard6.jpg)
![[ img ]](http://i566.photobucket.com/albums/ss105/DATO4/bottles.jpg)
![[ img ]](http://i566.photobucket.com/albums/ss105/DATO4/before.jpg)
![[ img ]](http://i566.photobucket.com/albums/ss105/DATO4/after.jpg)
![[ img ]](http://i566.photobucket.com/albums/ss105/DATO4/IMG_0157.jpg)
![[ img ]](http://i566.photobucket.com/albums/ss105/DATO4/IMG_0065.jpg)
![[ img ]](http://i566.photobucket.com/albums/ss105/DATO4/IMG_0122.jpg)
![[ img ]](http://i566.photobucket.com/albums/ss105/DATO4/IMG_0123.jpg)
![[ img ]](http://i566.photobucket.com/albums/ss105/DATO4/IMG_0129.jpg)
![[ img ]](http://i566.photobucket.com/albums/ss105/DATO4/IMG_0121.jpg)
![[ img ]](http://i566.photobucket.com/albums/ss105/DATO4/IMG_0130.jpg)
![[ img ]](http://i566.photobucket.com/albums/ss105/DATO4/IMG_0153.jpg)
![[ img ]](http://i566.photobucket.com/albums/ss105/DATO4/IMG_0155.jpg)
![[ img ]](http://i566.photobucket.com/albums/ss105/DATO4/IMG_0156.jpg)
![[ img ]](http://i566.photobucket.com/albums/ss105/DATO4/367bf0de.jpg)
![[ img ]](http://i566.photobucket.com/albums/ss105/DATO4/3438a0ad.jpg)
![[ img ]](http://i566.photobucket.com/albums/ss105/DATO4/27f7b8a4.jpg)
![[ img ]](http://i566.photobucket.com/albums/ss105/DATO4/IMAG0064.jpg)
![[ img ]](http://i566.photobucket.com/albums/ss105/DATO4/IMAG0063.jpg)
![[ img ]](http://i566.photobucket.com/albums/ss105/DATO4/816779d4.jpg)
![[ img ]](http://i566.photobucket.com/albums/ss105/DATO4/091e77ac.jpg)
![[ img ]](http://i566.photobucket.com/albums/ss105/DATO4/3410bea3.jpg)
![[ img ]](http://i566.photobucket.com/albums/ss105/DATO4/becd8005.jpg)
![[ img ]](http://i566.photobucket.com/albums/ss105/DATO4/IMAG0174.jpg)
![[ img ]](http://i566.photobucket.com/albums/ss105/DATO4/IMG_0126.jpg)
![[ img ]](http://i566.photobucket.com/albums/ss105/DATO4/IMG_0164.jpg)
![[ img ]](http://i566.photobucket.com/albums/ss105/DATO4/IMG_0167.jpg)
![[ img ]](http://i566.photobucket.com/albums/ss105/DATO4/c8.jpg)
![[ img ]](http://i566.photobucket.com/albums/ss105/DATO4/b7ab3608.jpg)
![[ img ]](http://i566.photobucket.com/albums/ss105/DATO4/3c1b128b.jpg)
![[ img ]](http://i566.photobucket.com/albums/ss105/DATO4/IMG_0214.jpg)
![[ img ]](http://i566.photobucket.com/albums/ss105/DATO4/IMG_0165.jpg)
![[ img ]](http://i566.photobucket.com/albums/ss105/DATO4/IMG_0166.jpg)
![[ img ]](http://i566.photobucket.com/albums/ss105/DATO4/IMG_0139.jpg)
![[ img ]](http://i566.photobucket.com/albums/ss105/DATO4/IMG_0238.jpg)
![[ img ]](http://i566.photobucket.com/albums/ss105/DATO4/IMG_0239.jpg)
![[ img ]](http://i566.photobucket.com/albums/ss105/DATO4/IMG_0237.jpg)
![[ img ]](http://i566.photobucket.com/albums/ss105/DATO4/4f160995.jpg)
![[ img ]](http://i566.photobucket.com/albums/ss105/DATO4/87d1a756.jpg)
![[ img ]](http://i566.photobucket.com/albums/ss105/DATO4/ca379458.jpg)
![[ img ]](http://i566.photobucket.com/albums/ss105/DATO4/IMAG0004.jpg)
![[ img ]](http://i566.photobucket.com/albums/ss105/DATO4/20120327_140352.jpg)
![[ img ]](http://i566.photobucket.com/albums/ss105/DATO4/IMAG0065.jpg)
![[ img ]](http://i566.photobucket.com/albums/ss105/DATO4/IMAG0066.jpg)
![[ img ]](http://i566.photobucket.com/albums/ss105/DATO4/IMAG0067.jpg)
![[ img ]](http://i566.photobucket.com/albums/ss105/DATO4/IMAG0107.jpg)
![[ img ]](http://i566.photobucket.com/albums/ss105/DATO4/IMAG0108.jpg)

![[ img ]](http://i566.photobucket.com/albums/ss105/DATO4/6d6eda6f.jpg)
![[ img ]](http://i566.photobucket.com/albums/ss105/DATO4/3cb3407c.jpg)
![[ img ]](http://i566.photobucket.com/albums/ss105/DATO4/FJ202.jpg)
![[ img ]](http://i566.photobucket.com/albums/ss105/DATO4/FJ208.jpg)
![[ img ]](http://i566.photobucket.com/albums/ss105/DATO4/FJ201.jpg)
![[ img ]](http://i566.photobucket.com/albums/ss105/DATO4/FJ205.jpg)
![[ img ]](http://i566.photobucket.com/albums/ss105/DATO4/FJ207.jpg)
![[ img ]](http://i566.photobucket.com/albums/ss105/DATO4/IMAG0181.jpg)
![[ img ]](http://i566.photobucket.com/albums/ss105/DATO4/IMAG0176.jpg)
![[ img ]](http://i566.photobucket.com/albums/ss105/DATO4/IMAG0177.jpg)
![[ img ]](http://i566.photobucket.com/albums/ss105/DATO4/IMAG0178.jpg)
![[ img ]](http://i566.photobucket.com/albums/ss105/DATO4/d554157f.jpg)
![[ img ]](http://i566.photobucket.com/albums/ss105/DATO4/IMAG0208-1.jpg)
![[ img ]](http://i566.photobucket.com/albums/ss105/DATO4/IMAG0199.jpg)
![[ img ]](http://i566.photobucket.com/albums/ss105/DATO4/IMAG0201.jpg)
![[ img ]](http://i566.photobucket.com/albums/ss105/DATO4/IMAG0206.jpg)
![[ img ]](http://i566.photobucket.com/albums/ss105/DATO4/IMAG0182.jpg)
